Wednesday, August 26, 2015

An FSJ Birthday Greeting


I have been in my happy place today, my studio. I had to say, “The dishes and laundry can wait,” but then it is just me and my husband.  I don’t think that we will suffer, but I knew that if I couldn’t get in my happy place, my husband would. LOL

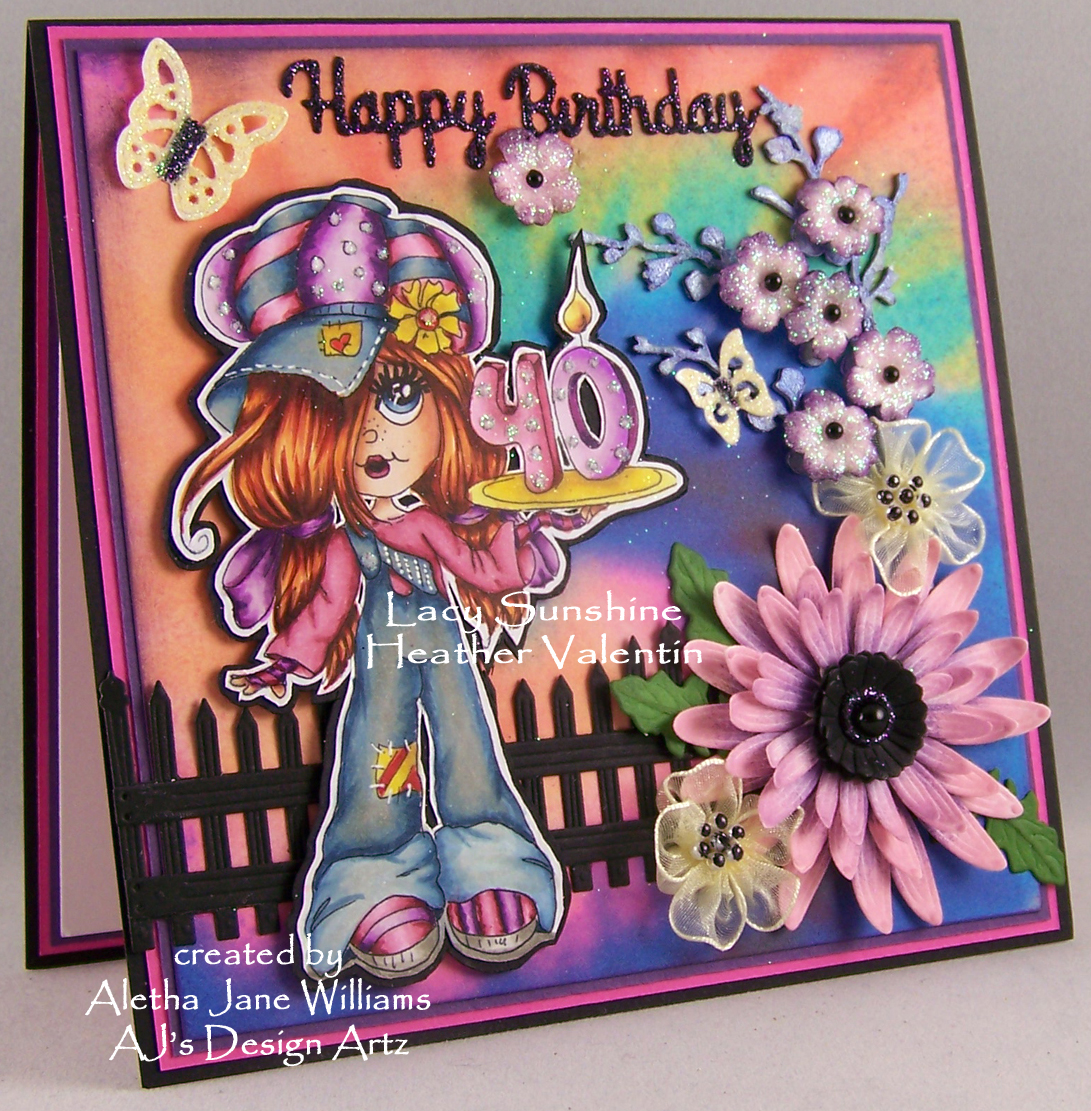
I have for you today a birthday art card created with some of my favorite stamps and dies. The first thing that I needed to do was some Copic coloring. I stamped the dahlias and leaves from Fun Stampers Journey (FSJ) Dahlia Burst stamp set with Black Licorice True Color Fusion ink on Copic X-press Blender Stock. I heat set the ink before coloring with Copics, no smearing whatsoever. I was amazed!

Copics used:
Dahlias: R81, 83, 85, 89, and
RV91, 93, 95, 99;
Leaves: G20, 82, YG67.

I cut my base card from FSJ Rock Candy cardstock at 5½” x 11” and folded that in half to have a finished 5½” square card. My designer paper is FSJ's new 12”x12” Vintage Paris which was trimmed to 5” square and layered with FSJ Sweet Berry and Rock Candy cardstock. Before completing the layering I distressed the edges of the designer paper and the Sweet Berry cardstock and brushed with Rock Candy ink. My middle panel was created the same way, but the finished size is 2 3/8” x 5 3/8”. I distressed the edges of the designer paper and cardstock and brushed with the FSJ Rock Candy True Color Fusion ink. My border on this accent piece is Spellbinder’s Mary Border Strip, cut in half, and mounted on the back of the accent piece.


The elements that really make the card are the FSJ Dahlia and the background Dahlia die cut. The Dahlia Burst Die Set includes dies for all three Dahlia stamps and the leaves. I cut the largest Dahlia die, along with the leaves die, with more FSJ Rock Candy cardstock. I am using the FSJ Rock Candy cardstock for the dies to help the Dahlia pop. I hope that you can see that I fussy cut the three Dahlia stamps and then layered with FSJ Foam Squares for more of a dimensional effect.  

The last two elements are my sentiment and the silver pearls. The “Birthday Wishes” sentiment is from the FSJ Elegant Flowers stamp set, which has a die set complimenting the stamps. I stamped the sentiment with FSJ Rock Candy ink on FSJ Whipped Cream cardstock. Trimmed the sentiment into an oval and mounted that onto the smallest die from Spellbinder’s Fleur de Elegance Nestabilities die set, cut from more Rock Candy cardstock. The silver pearls are from FabScraps Pearl & Rhinestones set in silver. I purchased these from StampingScrapping and received an unbelievable “moving” discount. Cindy has only three left, so you better hurry. She has some great prices on Spellbinder’s dies also.


Well, I guess by now, you have figured out that I am in direct sales with Fun Stampers Journey. Fun Stampers Journey is a very young company and the only way to go is up. I would love to have you on my team and become one of the leading FSJ’s Coaches. As with all new things there are still some glitches in our new website, but have patience, all will be well very soon. You can always place an order within my FSJ site, click here. Before you decide to buy our amazing products you can browse our current 2015-2015 Inspiration and Catalog here and our new mini Holiday Catalog here. If you are planning to order and you see that your order will be over $150 and before you check out, please contact me. I can set you up with a party, where you are a hostess, and you can reap all the hostess benefits. You would not want to miss out on those goodies!


I would like to invite you to my Facebook group, AJ’s Stampers Journey. I will be sharing my FSJ projects and I hope that soon you will also. Joining this group does mean that I will be sending you a catalog. If you have any questions, please contact me. Thanks for stopping by!


Aletha Jane

Friday, August 7, 2015

New Release Time at Aurora Wings!


It’s almost the weekend and I hope that a lot of you find time to be creative. Aurora Wings has a new release today. With that new release we have an Aurora Wings Designer’s Showcase blog showcasing a brand new sprite. We can never have too many of Aurora Wings' sprites.

Are you ready to learn a little about my creative process? This is post is photo heavy, of course, but hopefully you will learn something new.

Meet the latest addition of Mitzi's growing collection of sprites...Ice Cream Sundae Sprite
My first course of action is my Copic coloring of this cute little sprite.


Photo 1 will show you my first step getting my substrate ready. I added DecoArt’s Matte Medium to my watercolor paper. After that was dry is where I started adding DecoArt’s Modeling Paste and Tim Holtz layering stencils Bubble and Hearts.
I let this dry overnight and added more matte medium the next morning.


Photo #2 is my beginning of adding some fun new spray paints.
The paint shown here is Pink Cherry Fizz. I love the way it dripped and dried.


Photo #3 is my last layer of paint. This one is Peacock Teal Shimmer.
I love the blue of the pink and teal combination.


Photo #4 is all about my doilies. Doily A is a combination of Vivid Violet and Peacock Teal Shimmer. Doily B is Peacock Teal Shimmer only. The shimmer in this Peacock Teal is unbelievable. (If you would like the links to these amazing paints,
please email me at ajsdesigns@cox.net. The subject line should read “paint links.”)


These last two photos are really close ups of more embellishments. My sentiment is computer generated. 
"Happiness" is a wooden embellishment from Prima and painted with DecoArt’s Black Gesso. 


Before I go any further, I would like to say that I will be creating a 6” journal dedicated to Mitzi’s sprites. My inspiration for this adventure comes from a dear friend of mine, Bonnie. Check her blog, Artful Digits, for more mixed-media goodness. (Yes, Bonnie, I am using your technique of fussy cutting the image and layering. Thank you!)

Below is the final piece. You can see the glass reflection of the Fun Stampers Journey Glaze that I added to the sprinkles and glass dish. My flags were created with Fun Stampers Journey's 2" wide Sweet Tape. I placed the tape on watercolor paper and drew the flags on the back, cut them out, and added them to the piece. The candy dots are Fun Stampers Journey's Candi Dots. Take a visit to my Fun Stampers Journey site and check out the new catalog, lots of fun stuff this year.


Did you know…?

That including our Aurora Wings Showcase Blog, we have a Stamps by Aurora Wings Facebook group, There is a contest/challenge for you to join every month.

At our Aurora Wings Challenge Blog, a new challenge begins every third Monday of the month. This month our theme is “Things with Wings.” You know Mitzi has many images with wings, so why don’t you join for your chance to win some images. Those using an Aurora Wings image may enter up to three times. I would advise you to use an Aurora Wings image.

How about a Stamps by Aurora Wings weekend sale? You have a chance for even more savings checking out the “sales” section and use your sale code along with those savings. 


Thanks for stopping by. I hope that you head over to our Aurora Wings (AW) Showcase blog and check out the fantastic pieces of art created by all the AW Showcase designers.

Aletha Jane

Tuesday, August 4, 2015

My Darling Daughter Turned 40!


I guess that would make me at least 21 years older. LOL Anyway, she is the one who had the 40th birthday. With that said, I created her a very special art card for her fortieth year of life.

My daughter Heidi has caught the Copic bug and I have been giving her a few Copic pointers. In this process, she fell in love with Heather Valentin’s (Lacy Sunshine) images. Her favorite character, out of all of Heather’s original characters, is Rory. I asked Heather if she could create a Rory with the numeral “40,” and this is what she came up with. Heather’s imagination is wonderful, original, and amazing. 


Copics are the first medium of choice, for me anyway, for coloring any Lacy Sunshine images. As you will be able to tell, Heidi’s favorite colors are pink and purple.

I will not take you through my whole creative process, but I will show you a few pictures showcasing some new Sunshine glitters and a few Spellbinder’s dies.

The picture above is the best showing of Heather’s glitters. The mini flowers were some extras that I had in my pile. Before adding the glitter I brushed on some Fun Stampers Journey (FSJ) Deep Lilac True Color Fusion Ink to the ends of each petal. The glitter on the flowers is Frosted Snow from Heather’s Sunshine Iced Pastels Kit. Look at that sparkle!!!  For the final touch for the flowers, I added some black flat-backed pearls to the center. The butterfly is from Tattered Lace Butterflies and I sprinkled Heather’s Frosted Lemon Drop, also from the Sunshine Iced Pastels Kit. The butterfly’s body is covered with Sunshine Blackberry glitter. My sentiment, Happy Birthday, was die cut from FSJ Black Licorice cardstock with Spellbinder’s die Sentiments 3. Can you see the branch that the flowers are attached? That is a stray chipboard piece that I coated with white gesso. When that was dry I sprayed with one of Heather’s new line of paints, Sweet Lilac Shimmer. I wish that my camera could pick up the shimmer. Believe me it is a’ shimmerin’.


In this picture (above) shows my Gerber Daisy. I am having a lot of fun with Spellbinder’s “create” a flower die series. This Gerber Daisy was cut from FSJ Bubble Gum cardstock. Before my assembly of the daisy, I sponged on some FSJ Pretty Pansy ink on each petal center. After the assembly was completed I added a black flat-backed pearl to the center and some of Heather’s Blackberry glitter. Even as dark as that center is, you can still see the entire blackberry sparkle.


And now for the completed project…this is a 6” square art card. The base is trimmed from a 12” square of FSJ Black Licorice cardstock, folded for a finished 6” square card. My bottom two layers are trimmed from FSJ Watermelon Fusion and Deep Lilac cardstock. The background, which pulls it all together, is trimmed from Heather’s Tie Dye Swirls digital paper kit.


Did you know…?

We have a Lacy Sunshine Blog Challenge every two weeks. This is a “loyalty” challenge blog that I know you would be thrilled to be a part of. We also have another challenge going on at the Lacy Sunshine blog and you will get to see the Lacy Sunshine Creative Team showcasing their remarkable project.  Lacy Sunshine Facebook group. You will find a challenge just around any corner to win you some Lacy Sunshine goodness.
You are also invited to join our

Thanks for stopping by! If you have any questions, just contact me.
Aletha Jane

I'm Moving!

I am moving my blog to my website at AJ's Design Artz . I hope you stop by!