
Showing posts with label roses. Show all posts

Thursday, December 11, 2014

RSD’s Christmas Party Hat


Happy Thursday everyone! This post is almost a repeat of one that I did with just my Copic coloring as my subject matter and introducing our second part of our Sparkle & Glitter Progressive challenge. I did promise in that earlier post that I would have a project made with Rick St. Dennis’s (RSD) beautiful image “Christmas Party Hat.” That's what this post is all about. Rick has so many gorgeous images in his “hat” series. You can find them in his Etsy and Zibbet shops.

For my 6” square card I knew that I wanted to try a “Shabby Chic” style, but was very uncertain if I could pull it off. I think that I almost reached that style. I know that I still need a lot of practice, but I was rather satisfied with the finished piece.


I first colored Christmas Party Hat with Copics and accented in some places with a clear glitter pen and a white gel pen. She was trimmed with some matting basics dies. After trimming, I distressed the edges on both pieces and distressed further on all edges with a light and dark brown ink. On the top piece I added some white embossing powder and ultra-thick bronze embossing powder.


Copics used:
Skin: E000, 00, 04, 11, 21, R20;
Hair: E21, 23, 25, 29;
Leaves and Bow: YG91, 93, 95, 97, 99;
Roses: R01, 02, 05, 08, 89, W6
Fur and Feathers: C00, 0, 1, 2, 3, 4, YG91;
Hat: W000, 1, 2, 3, 6, R01;
Background: W00, 0, 1, 2.


Now it’s time to add all the details around my central image. I wanted a doily somewhere peeking out. That doily is in the background enhanced with white gesso, embossing enamel, glitter glass, and brown inks. Most of my roses are handmade. After they were completed, I dipped the edges of the roses with DecoArt white shimmer paint for the red ones, and a shimmering red paint for the white ones. The one that was made from paper got the white treatment.
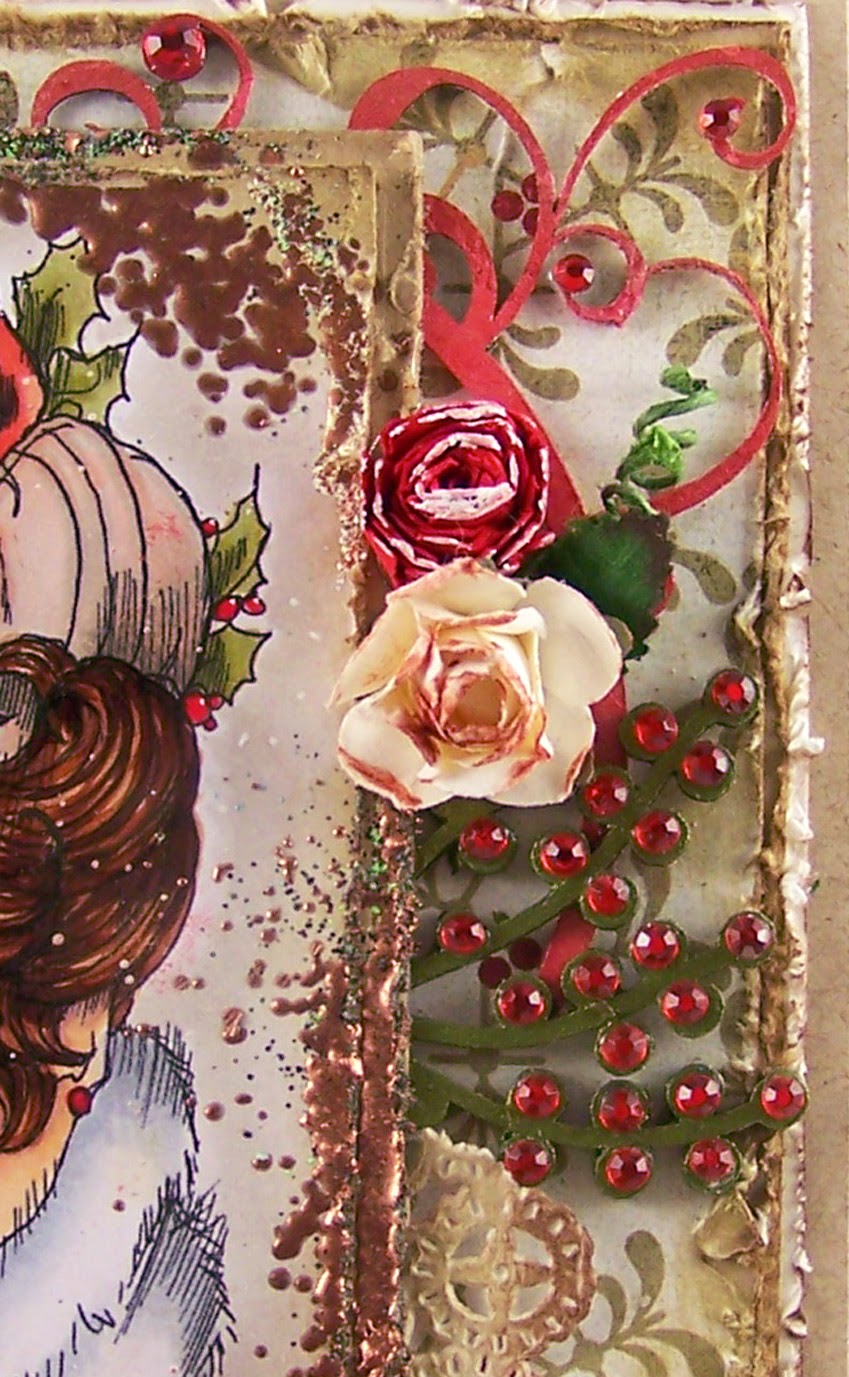


I wanted something that emulated holly. I found some chipboard stems that I painted with a metallic green and added red rhinestones for berries. I also found a chipboard circle frame that I spayed with some DecoArt shimmering white paint. After that was dry I daubed on some red ink on top of the white paint. It kept that shimmer. I am really enjoying my DecoArt products. I cut that in half and added to the top and bottom corners.

My finished piece may not be truly shabby chic, but it is definitely mixed-media.


My list of supplies:
Oatmeal Cookie, Butter Cream;
Paints: Deco Art-Acrylic Gesso, White Shimmer Mister,
Festive Green Dazzling Metallic;
Inks: FSJ Cocoa Powder, Oatmeal Cookie, Candy Apple;
Dies: Spellbinder’s Card Creator Matting Basics A & B, Bitty Blossoms;
My Stash: Embossing powders, doily, rhinestones, glass glitter

I would like to enter the following challenges:
Fresh Brewed Designs – Christmas Anything Goes
Creative Moments – Anything Goes/Winter
Inspiration Destination – Anything Goes
Through the Craft Room Door – Anything Goes

I hope you join us for our December Progressive Challenge Part 2. To enter, (you still have a few weeks), you must use “Christmas Party Hat” within your project. I would like to invite you to our Facebook group, Rick St. Dennis Fans and Friends. We have a bi-weekly art contest that has been lots of fun for the members. This art contest will begin again on January 5, 2015. Our blog, “Airless Chambers,” is participating in Smeared and Smudges 12 Days of Creepmas. Come join us and have some fun.

Thanks for stopping by. If you have any questions, please contact me.
Aletha Jane

Friday, May 9, 2014

For a Special Lady at Dilly Beans


It’s almost the weekend and what better way to start your weekend than being creative. We have a new challenge at Dilly Beans Challenge Blog. Our theme for the next two weeks is “For a Special Lady.” To enter you must use a Dilly Beans Stamps image. Why wouldn’t you want to use a Dilly Bean’s image? Megan has the perfect digital images, be it funny, big eye art, or creepy.


For my image I chose “Daisy Girl Framed.” I have colored her with Copics and added little accenting with Pink Wink of Stella Glitter Brush Markers. I also used Clear Wink of Stella Giller markers on the yellow roses.

Copics used:
Skin: E000, 00, 04, 11, 21, and R20
Hair: C1, 3, 5, 7, 9, and 100 Black
Daisies: R81, 83, 85, 89
Roses: Y11, 15, 17, and E31, 33
Leaves: C40, 82, 94, 99

My designer paper is from Flying Unicorn (I love their kits!). The finished layers are Stampin’ Up!’s cardstock in Basic Black and Certain Celery. The butterly rub ons are Kaiser Kraft and the flowers are from my stash, as is the butterfly charm.


Daisy Girl Framed will be entered in the following challenges:
Creative Fingers Challenge – Anything Goes
Get Inky – Mother’s Day
4 Crafty Chicks’s – Flowers
4 Krafty Girlz – Anything Goes

I hope you join this challenge “For a Special Lady.” When you do, drop by our Dilly Beans Facebook group and show us your little piece of art.

Thanks for stopping by. If you have any questions, please contact me.
Aletha Jane
Dilly Beans Designer

Tuesday, February 11, 2014

Gotta Love, Love, Love Tilda


Yes, Valentine’s Day is just around the corner. I know that I am late with this posting, but I wanted to show you this cute card that I finished last week as part of the StampingScrapping design team.

Meet “Love, Love, Love Tilda.” It has been a really long time that I did something just for the cuteness of it. That’s how I feel about the Magnolia stamps; they are just all so darn cute. In fact, I create a card for my Mother on her birthday every year. And each card has to be a Tilda. She adores them.


I colored Tilda with my Copics and added a little glitz with Spica pens. The cardstock is Stampin’ Up!’s Bravo Burgundy and Pretty in Pink. My designer paper is Trimcraft’s Rose Garden. This collection of papers is beautiful. I have used in many times in the last month. Tilda is cut with a circledie cut and then I added Memento Rhubarb Stalk to the edges.

Copics used:
Skin: E000, 00, 04, 11, 21, R20
Hair: E33, 35, 37, 49, 59
Dress & Shoes: R81, 83, 85, 89
Dress ruffle: C00, 3
Background: W00, 0, 1, 2, RV91

My die cuts were from Spellbinder’s Large Classic Circles and Butterfly Circles. See those little butterflies in the corners? Those are the waste from the Butterfly Circles. I need to keep that in mind when I am looking for very small butterflies.


The roses are from my stash. The LOVE wood veneer sentiment was altered using some gesso. I let that dry and then sprayed with Cranberry Adirondack Color Wash. Before the color wash could dry I wiped it down with a paper towel. The final embellishments are tiny pearls that were made with Petal Pink Liquid Pearls. The more I use the Liquid Pearls the more I am enjoying them. I will never want for a certain color in flat-backed pearls. You can even paint with them.

Love Tilda will be entered in the following challenges:
City Crafter Challenge – Project with the word “Love”
Magnolida Down Under – Hearts and Flowers
Through the Craftroom Door – Anything Goes
Artistic Inspirations – Anything Goes/Valentine’s Day
Fashionista Challenge – Shabby Chic

That’s it for today. If you have any questions, please contact me.
Aletha Jane

Saturday, February 1, 2014

Happy Heart Day with RSD


The weekend is here and in Oklahoma the weather is perfect for staying in my studio! That’s really not an excuse. If I am not cooking or doing laundry, that’s where you will find me.

My project today is for the month of February and Valentine’s Day. Rick has drawn one happy little dude for us, “Happy Heart Day 2014.” I call him my “happy little dude” mainly because I fell in love with that little face. It just makes you smile. You can find Happy Heart Day in Rick’s Zibbet shop or in his Etsy shop.

If you receive Rick’s monthly newsletter, you will notice some changes. There are no more monthly freebies. But there are two ways of obtaining Happy Heart Day. You can receive this image with any purchase between today and Feb. 15. Thereafter it will be available in the two shops listed above. We are still having our monthly challenge, but there is a change on the way the prize is awarded. The more people entering our monthly challenge the bigger the prize. The closing date for this challenge is Feb. 22. This gives the EDT time to visit your blogs and decide who we think is the winner; no Random.org is used for our challenges.


On to my project. My happy little dude was colored with Copics and a few Spica pens were added for some sparkly. The designer paper is BasicGrey’s Sweet Threads collection. My cardstock is from my favorite company, Stampin’ Up!, and is in Cherry Cobbler and Old Olive.

Copics used:
Skin: E000, 00, 04, 11, 21, R20
Hair: E42, 43, 44, 47, 49
Clothes & Hat: YG21, 93, 95, W6
Roses & Hearts: R32, 35, 37, 39, 89
Hose, Sleeve, Feather, & Collar: W00, 1, 3, 4
Shoes & Glove: C00, 1, 3, 5, 7, 9
Background: W00, 0, 1, 2, 3

Other supplies were: Ribbon, pins, metal leaves, red rhinestones, and roses, are from my stash. The dies are Spellbinder’s dies Labels 9, Classic Hearts, and Classic Scalloped Hearts.


I hope that you pick up your little fella and join in the challenge. After you do that, head over to our RSD’s Facebook Group and show us your little piece of art. If you use any of Rick’s images in your art, come on over and share with us.

Happy Heart Day will be entered in the following challenges:
Crafty Creations - Spring, Summer, Fall, Winter


Happy Valentine’s Day! If you have any questions, please contact me.
Aletha Jane

Saturday, June 1, 2013

Freebie Saturday at RSD

We have had a couple of rough weeks in Oklahoma with Mother Nature. Central Oklahoma has been hit hard with tornados. Please take a moment with me and send healing thoughts and prayers to those that are dealing with their pain and suffering.


Even with all the storms, I did find some time to stay in my studio today and actually complete a project. It is June’s Freebie Saturday at Rick’s Elite Design Team’s Sparkle & Glitter blog.

I would like to introduce you to one of Rick’s lovely ladies “Desdemona.” Yep, the beautiful image is free for your pick up on our blog. We also have a contest for you using this image. To enter the contest you must use this image, but Rick has decided to through a twist in the mix. Your little piece of art must be “anything but square and no sharp corners.”


I have colored Desdemona with my Copics, of course, and accented a little with Spica pens and rhinestones. After I cut her out with a die, I used Distress Ink in Black Soot and Chipped Sapphire. I also distressed the roses with Chipped Sapphire.

Copics used:
Skin: E000, E11, E13, BV000
Lips: R20, R89
Hair: E50, E34, E29
Costume: B63, B66, B69
Background: W0, W1, W2, W3


Other supplies:
Cardstock: SU Brilliant Blue
Designer paper: my stash
Dies: Spellbinders Fantastic Flourish 2 and A2 Curved Matting Basics A
Rhinestones & roses: my stash

I would like to enter Desdemona in the following challenges:
Allsorts Challenge Blog - Here come the girls
Bloggers Challenge - To die for


I hope you join us for our three week contest. After you have posted your entry, be sure and share with us on Facebook and Paper CraftPlanet.

Thanks for stopping by! No more storms until Tuesday!
Aletha Jane
Sparkle & Glitter DT


Tuesday, March 12, 2013

Summer is on Its Way!

At least we do hope we have a summer. We are still waiting on spring in Oklahoma, but this week, spring may be here at the latter part of the week. First of this week our lows were in the 20s and 30s. Thursday we are suppose to have 77° weather. Happy dance!

I would like to introduce you to one of Rick St. Dennis MFA new images, Été. Été is the French word for summer and I do hope that she looks summery.  I love roses, but unfortunately my green thumb does not include roses. I do try every year to grow them.
 

This little piece of art was simple to make. I colored Été with Copics (my E11 did mess up) and added Spicas for a little glitter. Stampin’Up! card stock was used for my base and die cuts. The background designer paper is from my stash. I have no idea who the designer is, but I did purchase it at Hobby Lobby. Next came the dies cuts. I cut with Spellbinder’s Les PappillionsTwo and Grateful Lattice. These two dies were introduced at the past CHA 2013 show. Rose and leaves are from my stash and accented with Crystal Stickles. Pretty easy, huh? (I will have her posted today in my Zibbet shop.)
 

Été will be entered in the following challenges:
Through the Craftroom Doors – Anything Goes
One Stitch at a Time – Anything Goes

That’s it for this beautiful Tuesday. I hope to see you again soon.
Aletha Jane
AJ’s Design Artz

I'm Moving!

I am moving my blog to my website at AJ's Design Artz . I hope you stop by!